Mario Bros. 1, 2 and 3 Glitches and Tricks
The SNES ports of these games contain almost the same physics as their NES/FDS counterparts, so you can use most of them in SNES Super Mario All Stars as well.
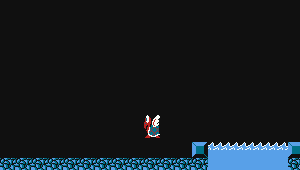
Walljump (SMB1, SMB2j, SMB3)
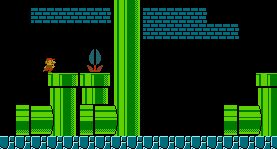
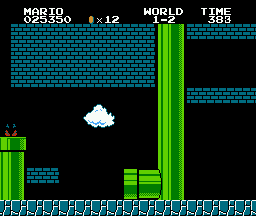
 Walljump is when you jump towards a wall and somehow Mario's foot catches the wall and allows to jump again, boosting from the wall. The walljump in the left image is easy to try even on the real console. In the right image (using a custom map), three walljumps are performed.
Theory: Walljump happens because the game does a floor check (a simple "is position divided by 16 even? Is there a solid block below him?" test) even during a wall-ejection. Wall-ejection is SMB's mechanism to adjust Mario's horizontal position properly when his left side and right side have a different inside-wall status. The game ejects Mario towards the opposite of his steering.
To perform a walljump, you need two things:
- Some horizontal speed (towards the wall)
- Mario's feet must hit the wall exactly at a block boundary (every 16 pixels)
It's possible to perform walljump from any non-lethal solid material (bricks, pipes, etc).
In SMB3, the trick works exactly the same way as in SMB1, but is harder to perform, because the game is more effective in preventing inside-wall situations.
Vine teleporting glitch (SMB1, SMB2j)
If you touch a vine at the extreme left edge of the screen, you'll be transported to the right edge.
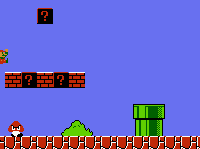
Uses: In 4-2 of SMB1, hit the vine block and get up on the ceiling. Walk to the right so that about half of the vine block gets scrolled off the screen, and the vine will dissappear. Go back to the left and touch the vine, and if you went the correct amount to the right, you'll be teleported to the extreme right edge of the screen. If you misestimated the amount, you'll get stuck in the left edge of the screen.
Alternate pipe glitches (SMB1, SMB2j)
The alternate pipe glitch is when a pipe takes you to somewhere other than where it was intended to.Let's define a word Entry which can be a pipe or a vine.
Theory: Technically ? the game can have only one Entry per a screenful. The reason lies in how the game is designed: There is just one global variable in the game RAM that determines where pipes or vines in the current screen lead. In the same screen there cannot be Entries to different places. Once the screen scrolls far enough for the next target label to be loaded from the level data, all Entries in the current screen will lead to that place. Thus, the screen scrolling position determines where the current Entry leads.
- If the screen is behind Mario (Mario is on the right side of screen), you can enter the previous Entry's target.
- In 4-2 of SMB1, after doing the vine teleporting glitch, you can enter the next pipe and it will lead you to where the vine would have led.
- The vine is not pivotal to this glitch. The only thing needed is that the screen hasn't scrolled too far when the pipe is entered.
- In 4-2 of SMB1, after doing the vine teleporting glitch, you can enter the next pipe and it will lead you to where the vine would have led.
- If the screen is ahead Mario (Mario is on the left side of screen), you can enter the next Entry's target.
- In 8-4 of SMB1, in the area before the water area, instead of going in the pipe after the lava pit, go a little past the previous pipe, and then turn around and go in that pipe, and it will take you to the water area instead of taking you back to the beginning of the level.
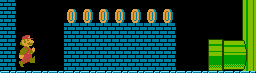
Going through bricks (SMB1, SMB2j, SMB3)
There are several occassions when Mario can partially or even completely enter a solid object (brick, question mark block, etc).The easiest of them, though not very useful, is to stand under a brick so that less than half of Mario is under the brick, and then jump up. Mario will not hit the brick, and will get pushed away from the brick instead.
When the pushing away effect happens, if you try to manually steer away from the brick, the brick actually pulls you inside instead of ejecting.
This is a basic technique which has many uses.
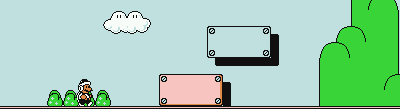
Application: Catch a fireflower/mushroom/starman before it appears
If you are quick enough, you can catch the bonus item through the block even before it has completely exited from the block it came from.
In the example image here, also is demonstrated that it's possible to jump again after picking a mushroom / fire flower (do an extra tall jump).
Application: Jump across a corner
Try this trick in SMB1 at 4-2 when you go to the ceiling next to the vine.Application: Jump into a solid object below a floor
For understanding the title, any solid object (including pipes) works as a floor. This trick is most commonly utilized in the horizontal pipe at the end of level 1-2 in SMB1 and SMB2j.
It is really difficult to perform (much harder than the walljump), but here are the instructions.
- You need proper speed. If the object is only 2 blocks tall, such as the pipe in the end of 1-2, you can not jump into it while running. Use the left+right trick to deaccelerate quickly before jumping. If you have too high speed, you'll just find yourself standing on top of the object instead of inside it.
- You need the right position. The right position is: as near as possible. You are too near, if when you jump toward the object, you'll bump into it without getting ejected pixel by pixel.
- Immediately when the wall starts ejecting Mario, start steering away from it at maximum power. This causes the wall to pull you in instead of push you out.
- Immediately after your vertical movement stops, start moving to the direction you want to go. If the wall is ejecting you now, you failed some of the previous steps.
This trick is apparently also possible in SMB3 (noticed against some water level end pipes), but the exact function hasn't yet been analyzed.
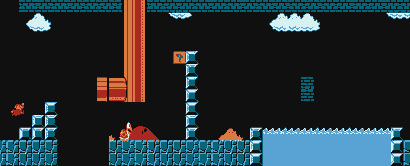
A special case of this trick is called 'the swim of death', as demonstrated in the image on the right. The physics of Super Mario Bros is nearly the same in air and in water, and thus walls can be entered in water too. Bisqwit discovered the trick accidentally when he tried to enter an underwater pipe in SMB2j as smoothly as possible. (The animation on the right is from SMB1 though.)
Application: Jump into a wall just below a solid ceiling and walk through it
With small Mario (SMB1, SMB2j)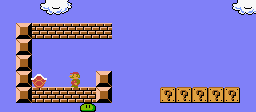
To perform the trick, do a walljump into the wall position right below the ceiling. When you get foothold, jump immediately. When you land, jump again. When you land again, jump again. Usually three or four jumps are enough before you can walk through the wall. Each jump takes you deeper into the wall.
During each of the jumps, you need to steer heavily to the opposite direction you're going to. Otherwise the wall will eject Mario.
You need to perform the trick at frame-by-frame precision to do it optimally.
Note that this trick cannot be done with small Mario in SMB3.
With big Mario (SMB1, SMB2j, SMB3)
 As demonstrated in the left image, big Mario doesn't need to do any of the complicated stuff that applied to when he is small. When he is big, he can simply perform a duck-jump into the corner and start walking. This is because his head will be well inside the ceiling, enabling the ejection to the right. (If he ducks again before he is fully inside the wall, he'll be ejected to the left instead.) This is actually the easiest way to enter the well-known "Minus World" in SMB1.
Application: Jump into a solid wall and walk through it
It is possible to perform the wall-entry trick even without a ceiling. However, it requires incredible luck and precision. This is the hardest of all of the tricks.
The key to perform the trick is to jump into the wall in such curve and speed that when Mario tries to jump again, he'll hit the upper block inside the wall, instead of the ceiling that now does not exist.
Currently we don't know how exactly this is done. You just need to try thousands of times until it happens to go right…
This trick is not available in SMB3.
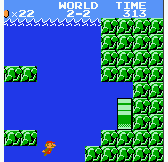
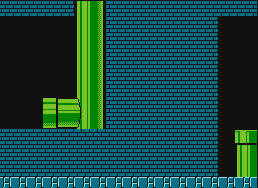
Application: Off-screen wall climbing (SMB1, SMB2j)
This trick is trivial to perform. When there is a hole on the left side of the screen, you can cram Mario in between of the screen edge and the wall, and climb upwards the hole. Mario will be unable to fall down. It can be used to reach the ceiling of the dungeon in places where there normally is no route to the ceiling.
By jumping repeatedly and steering to the left, it can also be used to enter the wall, as shown in the right example image.
Besides brick walls, it works also with castle walls, pipes and other types of solid walls.
Accelerating faster (SMB1, SMB2j)
When you need to accelerate from zero speed, you can do it faster if you jump a small jump backwards and steer to the opposite direction Mario is facing.
This has three uses:
- Starting a level faster
- Exiting a pipe faster
- Completing a walljump faster
This trick obviously can not be used if you are unable to jump (such as when performing the 'jump into a solid object below a floor' trick).
Shooting faster (SMB1, SMB2j)
By pressing right+left at the same time, you can shoot to the left and the shots travel horizontally at twice the normal speed. It looks very aggressive, compared to the normal merrily bouncing fire balls. Though, this technique is more userful in water levels since it doesn't slow down Mario."Stomping" enemies from the below (SMB1, SMB2j, SML1)
You don't need to land on the top of an enemy to kill it. As long as you're moving downward as you hit the enemy, you'll kill it. If you time it just right, sometimes you can even hit the bottom of the enemy. This is useful for killing enemies that seem to be too high to jump on.
Special case: Moustache stomp
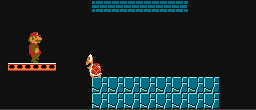
This is not a walljump.
This image illustrates how "landing" on a turtle at the right time can save Mario's life, even if it is only his moustache that lands on the turtle…
Alternative names: koopa jump, belly kick.
Walking inside enemies (SMB1, SMB2j)
When you stomp an enemy, the enemy becomes a friend for a short while, so if you stomp it from below, you don't need to worry about being immediately killed by it when you bounce upwards.
In fact, you can sometimes get inside an enemy right after stomping it, and the enemy doesn't harm you as long as you're inside it.
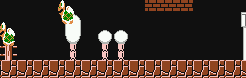
Bouncing high off turtles (SMB1, SMB2j, SMB3)
How it's done: If you jump toward a turtle while it's in the air, you can stomp it while moving upward and keep moving upward. The maximum height that you'll be able to reach if you keep holding down A depends on the exact frame that you made your jump and which part of the turtle you hit, so if you aren't bouncing high enough, keep adjusting your jump one frame at a time.
This is useful for being able to get over an obstacle or landing on another enemy after bouncing off a turtle.
In SMB2j, a special case was added for flying turtles: When you "stomp" them in upward motion, you'll gain a lot of vertical velocity.
In SMB3, the same can be done for a couple of walking enemies too, when you are running at top speed.
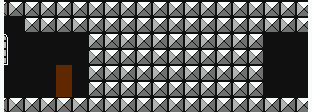
Jumping through hammers (SMB1, SMB2j)
How it's done: The game does a very poor job of detecting collisions with hammers, so sometimes you can go through a hammer without getting hit, and sometimes you can completely miss a hammer and still get hit.
When you reach Bowser in 8-4 or some other castle, even if it looks like there's no gap in the stream of hammers, it's still likely that you'll be able to get through without taking a hit.
It is obviously easier if you're small or ducking.
Turning around quickly (SMB1, SMB2j)
Shortly: Press left and right simultaneously for 1 frame.When you press left+right, you'll start walking backwards to the right. How exactly it works is slightly different in SMB1 and SMB2j, but what is common for both of them is that your running speed is instantly reduced to a walking speed or even slower. This allows for a much more sudden braking. It can be applied anywhere where you need to brake quickly.
Avoiding fireworks (SMB1, SMB2j)
In SMB1, fireworks come when a level is completed with the last digit of the timer at 1, 3, or 6.In SMB2j, fireworks come when the last digit of your coin counter matches the last digit of the timer.
Getting fireworks wastes time, so you should avoid them.
Sliding on one foot (SMB1, SMB2j)
This is a well-known trick which requires the fiery Mario. When you start a level or exit from a pipe, hold B and jump, and continue holding B. When you move, Mario will slide instead of running, for some time. This trick is trivial to do on the real console.
Lip jumps (SMB1, SMB2j, SMB3)
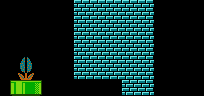
It is possible to stand on the edge of a pipe even where's a plant coming out of the pipe. There are a few pixels of room at both sides of the pipe. You can land on it, and jump immediately again.
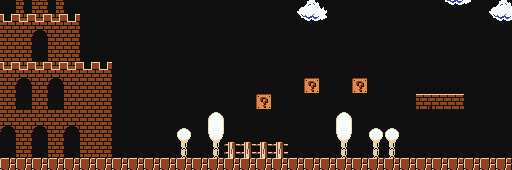
The "21 frame rule" (SMB1, SMB2j)
In SMB1 and SMB2j, every time the screen blacks out (enter a new level, enter a pipe, exit a pipe), the game delays for a varying amount of time.The delay is actually calculated so that the current playing progress will be rounded up to next 21 frame boundary.
As an example, this means that if you complete a level in
- 1 frames, the level length will be N+21 frames
- 15 frames, the level length will be N+21 frames
- 20 frames, the level length will be N+21 frames
- 21 frames, the level length will be N+21 frames
- 22 frames, the level length will be N+42 frames
- 30 frames, the level length will be N+42 frames
- 42 frames, the level length will be N+42 frames
- 43 frames, the level length will be N+63 frames
Therefore, the only part of the game that can be improved by a time less than 21 frames is the last part of the last level.
Small fiery Mario / negative Mushroom (SMB1, maybe SMB2j too)
(The following explanation is copied from Wikipedia . It is a good explanation, but someone seems to stick to that it is �fan cruft� and does not belong into an encyclopedia. Thus copying it here instead of linking to the Wikipedia article.)Internal to the game, Mario's powerup state is recorded in two independent variables; one describes size (0=regular; 1=super) and the other tracks the ‘upgrade state' (0=need mushroom; 1=need flower; 2=has flower). The ‘size' decides the sprite (small on 0; big on 1) used for Mario; the ‘upgrade state' decides what powerup will come out of a block (mushroom on 0; flower on 1 or 2) and what will happen when Mario is hit (die on 0; switch ‘size' and clear ‘upgrade state' on 1).
These states can be knocked out of synchronization. The game checks for all sprite collisions, knocks the ‘upgrade state' to 0 if it hits, and switches size only when all checks are done. If Mario's sprite strikes the King Koopa sprite and the bridge release sprite in one frame, the game will register the collision between Mario and Koopa, knock the ‘upgrade state' to 0, register the collision between Mario and the bridge release, and jump into the level complete loop that causes Mario to walk to the right ? and never switches the ‘size' variable.
If Mario was naturally large (state 1 or 2, size 1) when he hit the switch he will stay large (state 0, size 1). If he strikes an enemy he will die (because his ‘upgrade state' is 0), but he can break blocks. If he gets a mushroom, he will shrink and be unable to hit blocks; if he is hit now, he will grow again. If he gets a fire flower, his palette will be changed and he will be able to shoot (but the game will use the large image for shooting; it will, however, keep Mario's small feet if Mario is moving). Mario will now be Little Fiery Mario.
If Mario was naturally small (state 0, size 0) when he hit the switch, he will appear to die but the level will still be beat and he will not lose a life. If Mario was unnaturally small (state 1 or 2, size 0) when he hit the switch (that is, if he does this trick twice), he will revert to his normal form. When Mario dies his size is set small and his state is set unupgraded, no matter how he died or what his state was before.
Using the third part only of a 3-code Game Genie code for “Always Stay Big” will produce similar results (the code is SZLIVO). As long as Mario has gained a power-up, he will become small when hit, then grow when hit a second time. This is a much simpler way to view the “Little Fiery Mario” quirk.
This glitch appears to have been fixed in the Super Mario All-Stars version, though the two-variable mechanism behind it still exists.
The Minus World (World -1)
Sharp readers already spotted that an example of how to get to the "minus world" was shown in the "Application: Jump into a wall just below a solid ceiling and walk through it" chapter of this page.The minus world is basically just a random location of the game ROM, it is not a real world. It wasn't designed that way ? it's just an oversight of the programmers that you can get into the pipe before the warp labels are assigned.
The information shown on these two following pages is hoax . There really is no exit from "world -1" (which is actually world 36, technically speaking). It was never designed to be.
- http://forums.cheatcc.com/forums/171950/ShowPost.aspx
- http://www.nestimes.silius.net/editorials/nl/smb/page1/
Source: http://tasvideos.org
Back to glitches and tricks